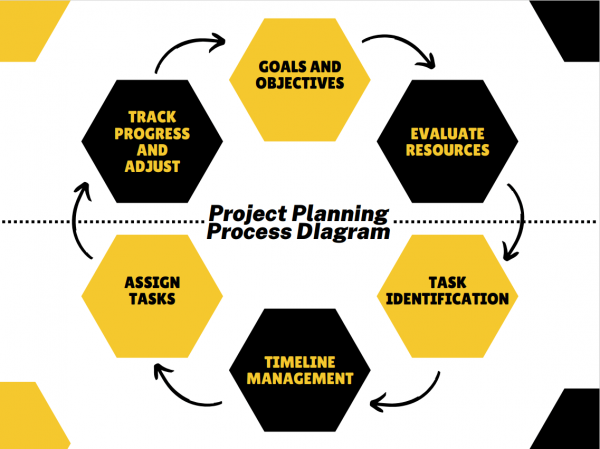
There’s something about utilizing visual aids that make it easy for team members, whether on-site or remote, to understand. Visual representation of processes helps to convey information much faster than words alone and may lend itself to a more efficient process.
Creating a planning process diagram is critical if you’re looking for ways to be as organized as possible.
What is a Planning Process Diagram?
A project planning process diagram is an essential tool for every aspiring project manager because it helps understand the project planning process and keeps track of progress. This diagrammatic also aids in identifying potential risks and issues that might arise during the project.
Project Planning Process Diagram
Steps
There are many project planning examples out there. The interpretation will be according to each company and its industries, products, services, and resources. But typically a project process planning has these main components:

Determining your goals and objectives
Any successful project starts with clear goals and objectives. With a sense of what you’re trying to achieve, it’s possible to create an effective plan or track your progress.
That’s why the first step in any project planning process is to determine your goals and objectives. What exactly do you want to accomplish? What are your targets? Once you understand your goals well, you can develop a plan to make them a reality.
By setting clear goals and objectives at the outset, you’ll set yourself up for success from the beginning.
Evaluating your resources
Evaluation resources include your human resources (i.e., who will be working on the project) and your physical resources (i.e., what materials you’ll need).
For each task in your project plan, you need to identify the people and materials required to complete it. To do this, you should consider both the skills and experience of your team members and the availability of materials.
Once you’ve identified all the resources required for your project, you can allocate them to specific tasks. Suppose you’re planning a marketing campaign, you need to consider whether you have the necessary personnel (e.g., copywriters, designers, etc.) and whether you have the budget for print or online ads.
Determining the tasks necessary to achieve your goals
You can do it one by one by brainstorming with the team, reviewing project documentation, or simply taking a walk through the project site. After identifying necessary tasks, you can prioritize and assign them to individuals or groups.
Planning a project properly can ensure that all the necessary steps are taken and that everyone understands their role in the process. It will help to avoid potential problems and delays further down the line.
Building a project timeline
A project timeline is one of the most critical tools a project manager has at their disposal. It shows the sequence of events and tasks the team needs to complete to deliver the project successfully.
You can create a timeline that will keep your project on track and schedule by following a few simple steps. The first step is to identify all the tasks that need to be completed to deliver the project. It may require some brainstorming with your team, but getting all of the tasks down on paper (or in your project management software) is essential.
Once you have all of the tasks, you can start sequencing them. In many cases, there will be dependencies between tasks. When sequencing the tasks, make sure to take these dependencies into account. Meaning you can only start work on task B after finishing Task A.
Now that you have all the tasks and their dependencies sequenced, you can start creating the timeline. Identify how long it will take to complete each task and then enter it into your project management software. Make sure to include buffer time for unforeseen delays or problems that may arise.
The timeline will be a valuable tool throughout your project’s life, helping keep everyone on track and focused on delivering a successful outcome.
Assigning tasks to team members
This process starts with understanding what needs to be done and then identifying who has the skills and experience to do it.
Once you have a clear idea of the workload, you can start assigning tasks. You should be as clear and concise as possible when assigning tasks so that team members know exactly what is expected of them.
You should also provide deadlines for each task so that everyone knows when it needs to be completed. If you need help assigning tasks effectively, plenty of resources are available online or from your local library.
Tracking progress and adjusting as needed
One of the most important aspects of any project is tracking progress and making necessary adjustments. Project managers can identify potential problems early on by monitoring progress and taking corrective action to keep the project on track.
Tracking progress provides valuable information that you can use to improve future planning cycles. By understanding which steps are taking longer than anticipated, project managers can make changes to help ensure a successful outcome.
A planning process diagram is one of the many essential planning tools for every aspiring project manager. It is a visual representation of the steps involved in planning a project which helps you understand, keep track of, and identify risks throughout the action.
This diagrammatic guide offers many benefits and can serve as a reminder, training tool, reference point, and mode of communication, amongst other things.
